What will I cover in this post?
We will learn how to use ghostunnel for the TLS communication between non-TLS client and server.
In this post, I plan on:
- Explaining what is ghostunnel
- Explaining how to to configure ghostunnel
- Explaining advanced security settings
What is ghostunnel?
The ghostunnel site explains it very well:
Ghostunnel is a simple TLS proxy with mutual authentication support for securing non-TLS backend applications.
Ghostunnel is the very simple TLS proxy and you are more then welcomed configure it using this post.
How to to configure ghostunnel?
Download ghostunnel
Download ghostunnel according to the site instructions to the server and to the client hosts.
Select a port for the TLS communication
Let’s select the port for the communication between a server and a client.
The port should not be blocked by firewalls in your organization.
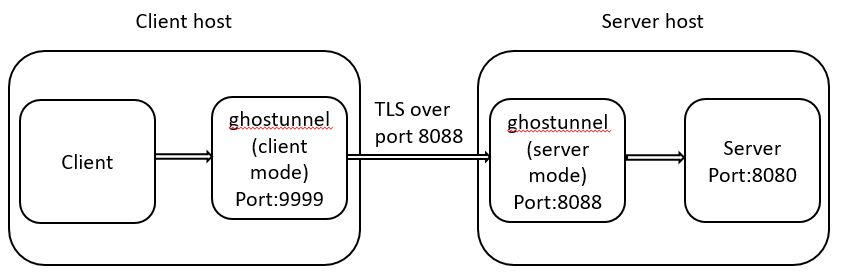
We will use the 8088 port the the post example.
In addition, we will suppose that our server uses 8080 as depicted in the diagram:
Create a server and a client certificates
I have described how to create the SAN certificates in my previous post.
Let’s create the server certificate
The command below will create a pkcs12 Java keystore server.jks with a self-signed SSL certificate:
keytool \
 -keystore server.jks  -storepass protected  -deststoretype pkcs12 \
 -genkeypair -keyalg RSA -validity 365 \
 -dname "CN=<server IP>" \
 -ext "SAN=IP:<server IP>"
Export the server certificate private and public keys
The command below export the private key to the file serverkey.pem:
openssl pkcs12 -in server.jks -nodes -nocerts -out serverkey.pem
You will need to provide the the keystore password (protected).
Enter Import Password:
MAC verified OK
The command below export the public key to the file servercert.pem:
openssl pkcs12 -in server.jks -nokeys -out servercert.pem
You will need to provide the the keystore password (protected).
Enter Import Password:
MAC verified OK
Let’s create the client certificate
The command below will create a pkcs12 Java keystore client.jks with a self-signed SSL certificate:
keytool \
 -keystore client.jks  -storepass protected  -deststoretype pkcs12 \
 -genkeypair -keyalg RSA -validity 365 \
 -dname "CN=<client IP>" \
 -ext "SAN=IP:<client IP>"
Export the client certificate private and public keys
The command below export the private key to the file clientkey.pem:
openssl pkcs12 -in client.jks -nodes -nocerts -out clientkey.pem
You will need to provide the the keystore password (protected).
Enter Import Password:
MAC verified OK
The command below export the public key to the file clientcert.pem:
openssl pkcs12 -in client.jks -nokeys -out clientcert.pem
You will need to provide the the keystore password (protected).
Enter Import Password:
MAC verified OK
Exchange public keys
Copy servercert.pem to the client side and clientcert.pem to the server side.
Starting ghostunnel in the server mode
Start the server simulation
Start the server simulation on port 8080 using Netcat:
nc -l localhost 8080
Start ghostunnel
Start ghostunnel using the command:
./ghostunnel server \
 --listen <server IP>:8088 \
 --target localhost:8080 \
 --key=./serverkey.pem \
 --cert=./servercert.pem \
 --cacert=./clientcert.pem --allow-all
You will see that ghostunnel successfully started in logs:
[7093] 2020/07/30 05:52:53.377716 starting ghostunnel in server mode
[7093] 2020/07/30 05:52:53.380213 using target address localhost:8080
[7093] 2020/07/30 05:52:53.380324 listening for connections on <server IP>:8088
Starting ghostunnel in the client mode
Start ghostunnel using the command:
./ghostunnel client \
 --listen localhost:9999 \
 --target <server IP>:8088 \
 --key=./clientkey.pem \
 --cert=./clientcert.pem \
 --cacert=./servercert.pem
Ghostunnel listens locally on port 9999. You will see that ghostunnel successfully started in logs:
[6836] 2020/07/30 05:57:43.894659 starting ghostunnel in client mode
[6836] 2020/07/30 05:57:43.896104 using target address <server IP>:8088
[6836] 2020/07/30 05:57:43.899389 listening for connections on localhost:9999
Test communication
Start the server simulation
Start the client simulation using Netcat:
nc -v localhost 9999
Type on the client side
nc -v localhost 9999
Ncat: Connected to 127.0.0.1:9999.
hello ghostunnel
Verify on the the server side
nc -l localhost 8080
hello ghostunnel
Congratulations! You successfully connected your client and server using TLS!
Advanced security settings
Prevent usage of AES_128 ciphers
Configure --cipher-suites CHACHA if you want to prevent usage of AES_128 ciphers for the communication.
Allow only specific client certificates
Do not configure --allow-all on the server side.
Configure the following --allow-cn, --allow-ou, --allow-dns or --allow-uri.
Take-aways
You should now have a knowledge of what is ghostunnel and how to configure it.